Blogs
Easy search experience using Search Blueprints

Bhargav R Vaghasiya
What is a Search Blueprint?
Search Blueprints is the first feature of the Search Experiences tool set. Search Blueprint is used to customize the search experience without deploying code to the portal.
How can we set up Blueprints?
To access the Blueprints, navigate to Application > Search experiences > Blueprints
-
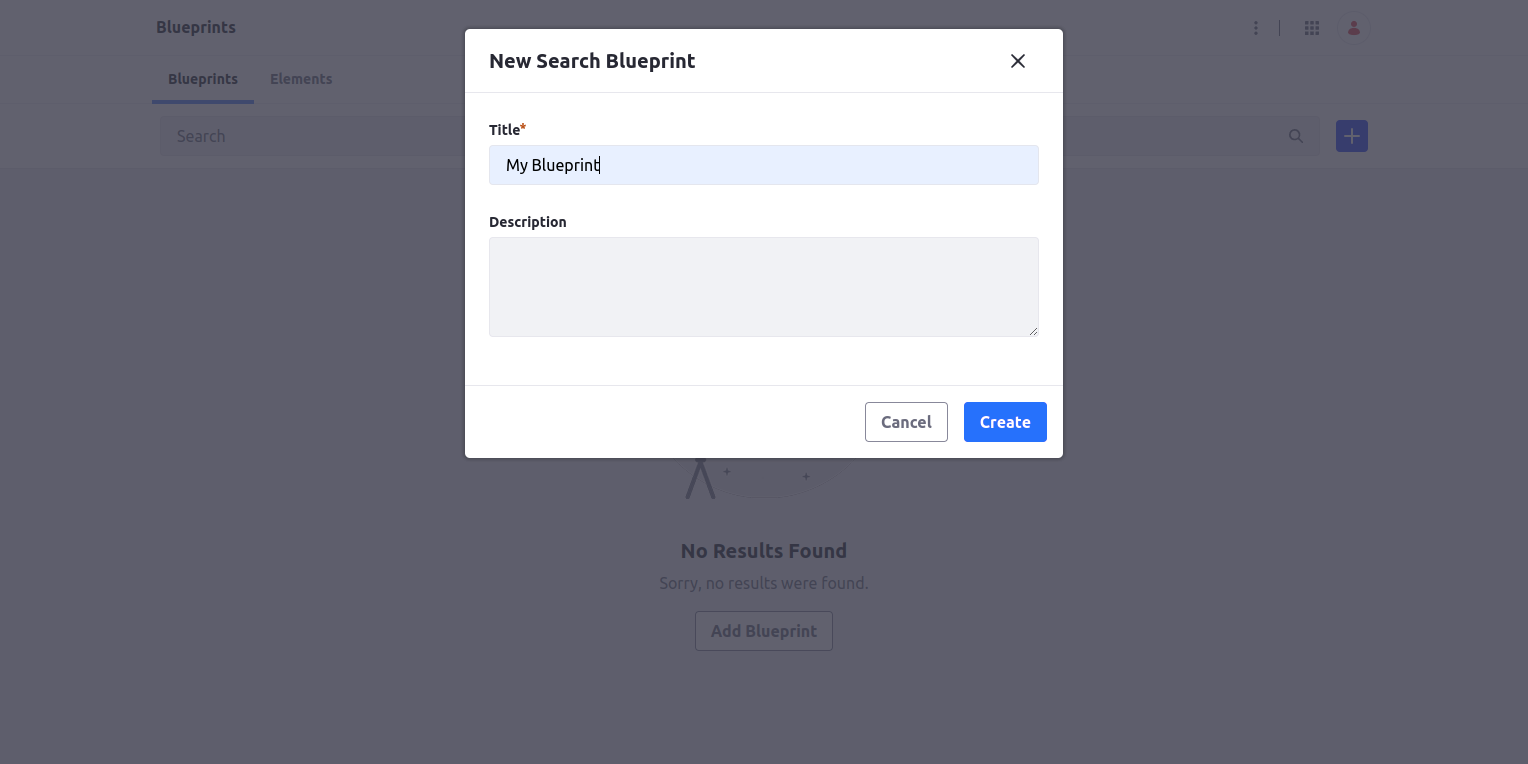
From this page, we can create new blueprints. While creating blueprints, it will ask for basic details, like below.
-
Once it is saved, it will open a panel like below.
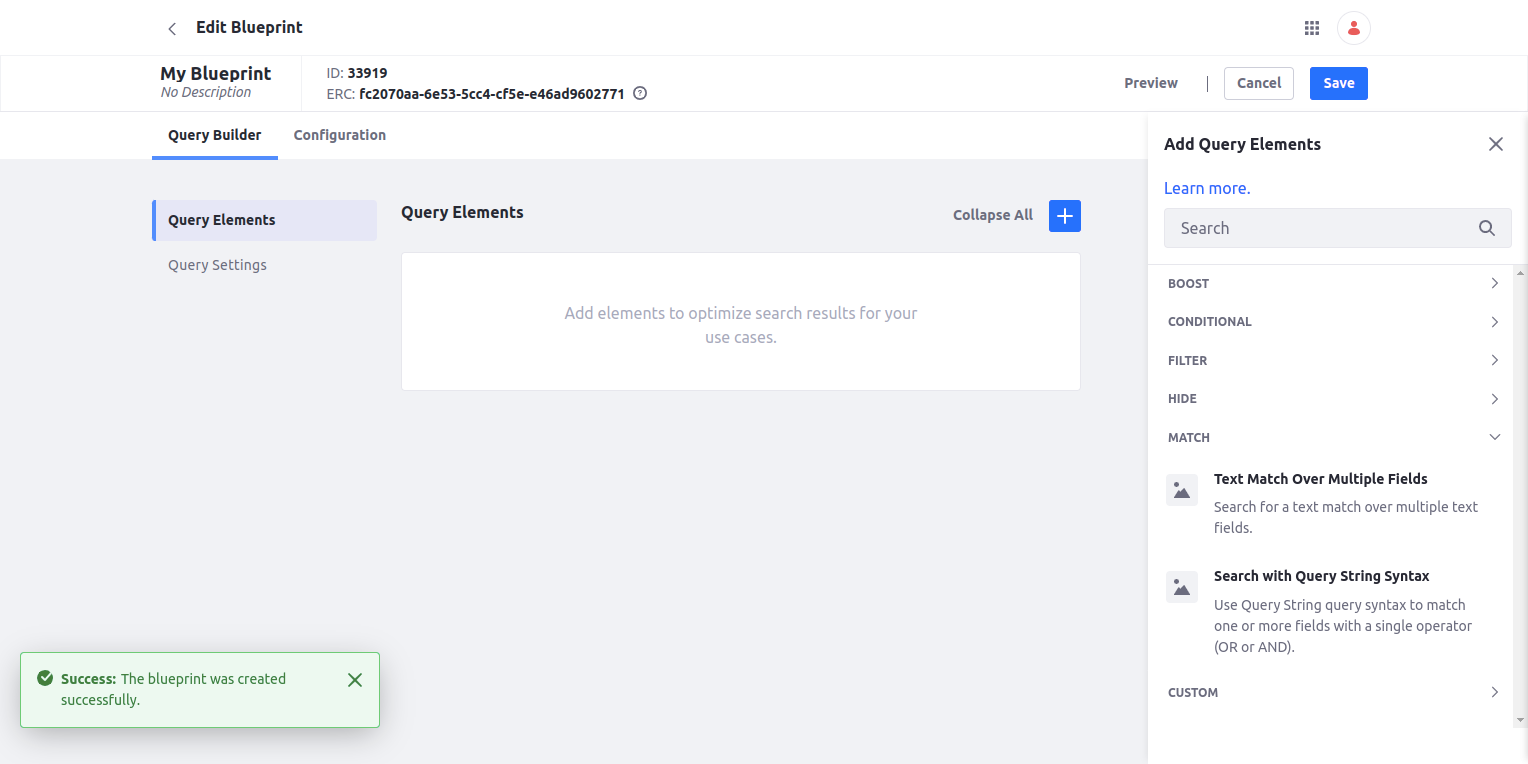
Under Query elements, we can set up boost, condition, filter, hide, match, and custom.
Boost:
-
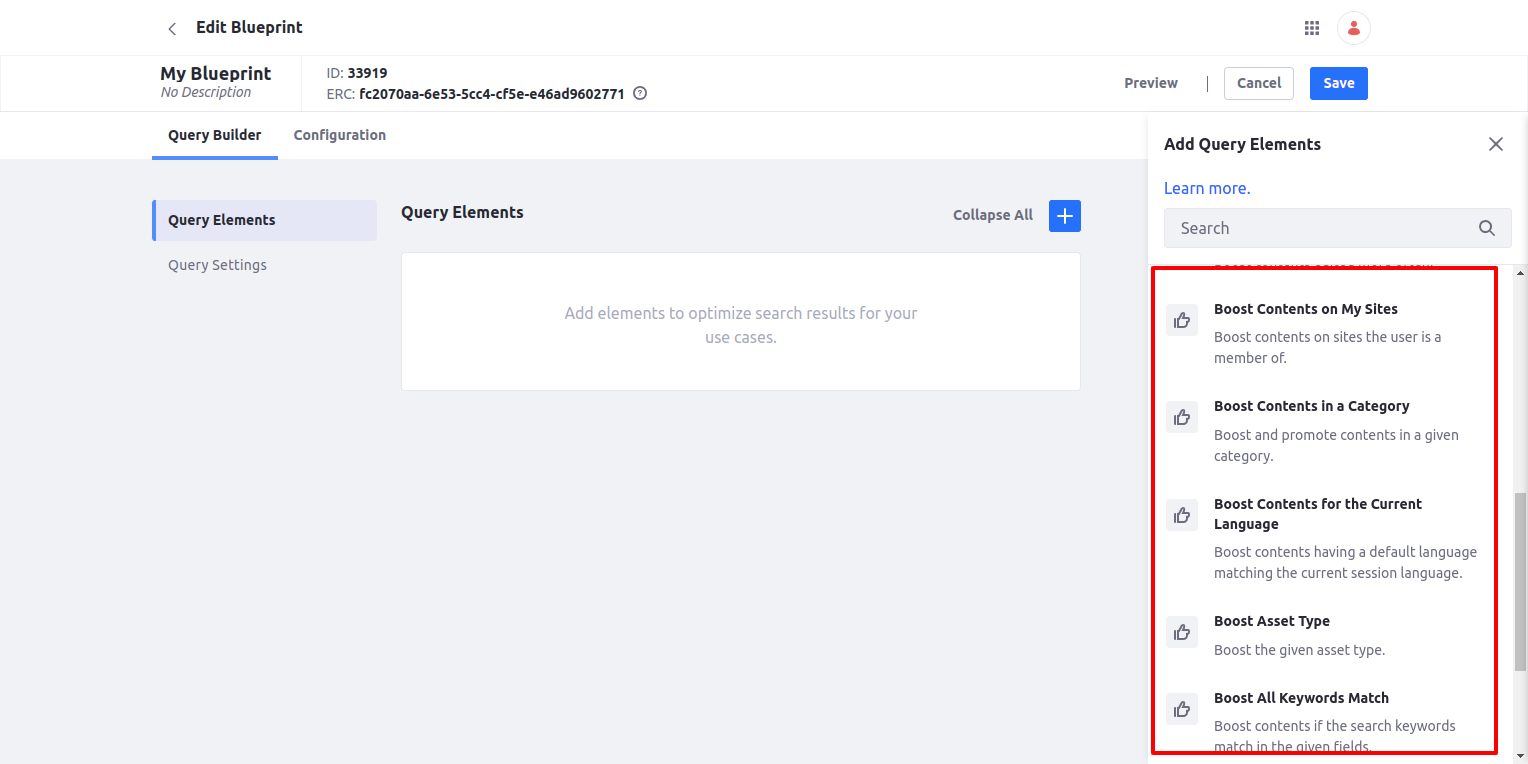
We can boost the particular record by adding a boost here.
-
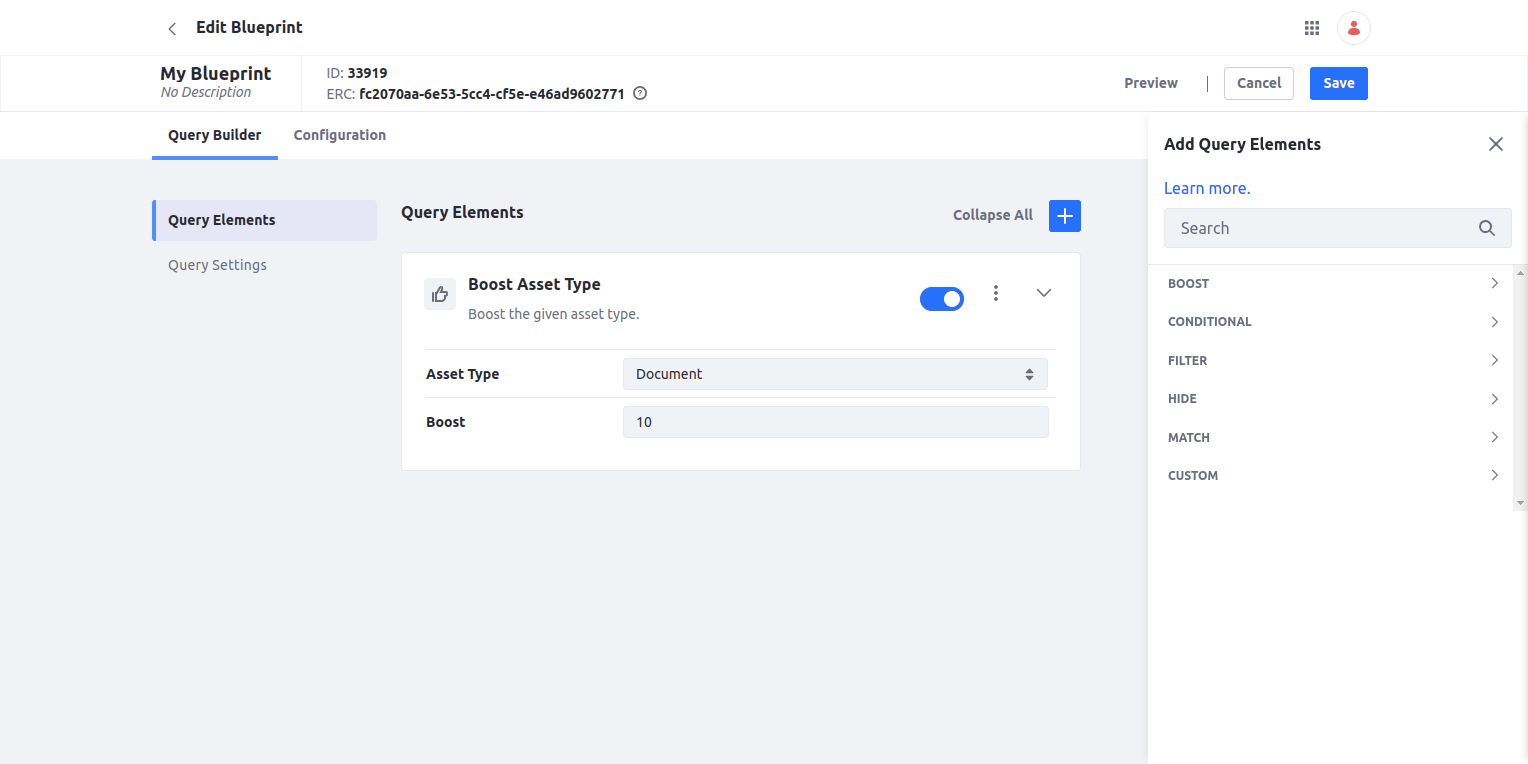
For now, I will boost the documents, and for that, I will add “Boost Asset Type” on the element section and select Document from the drop-down.
Conditional:
-
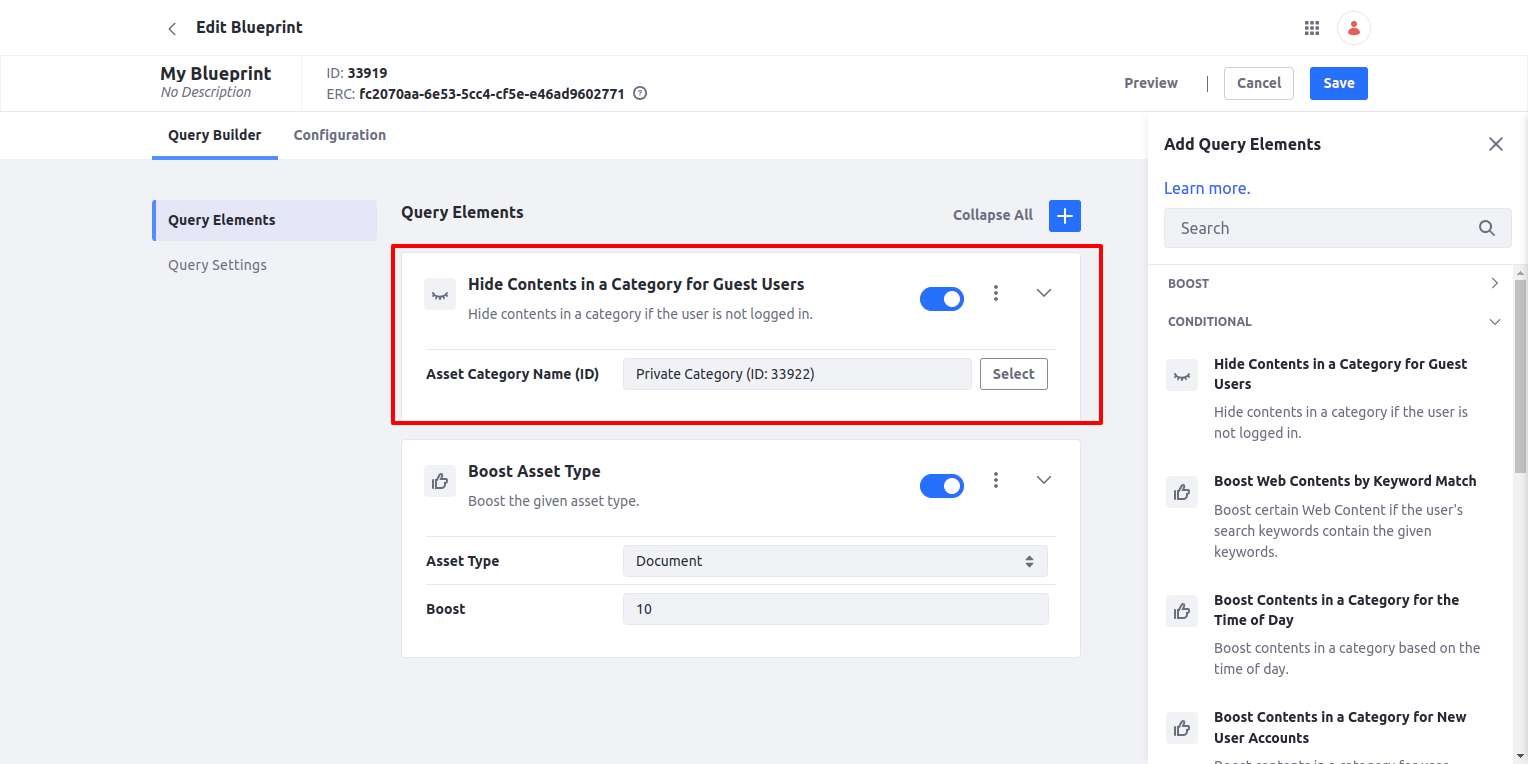
We can add different types of conditions based on keywords and categories.
-
For now, we will hide the content of the private category when the user is not logged in.
Filter:
-
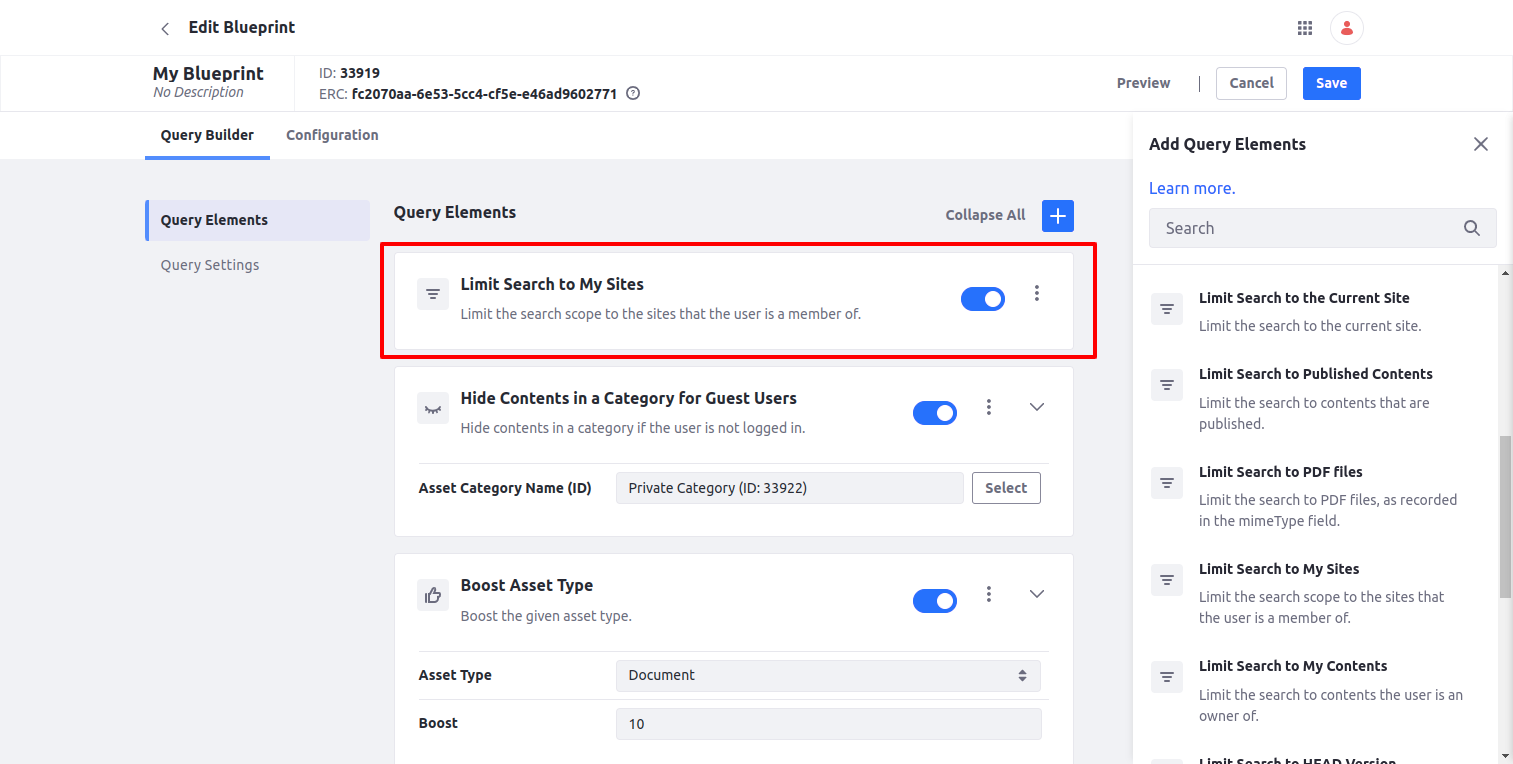
We can add various filters to this section to limit the results.
-
For now, we will restrict the records to the user’s site.
Hide:
-
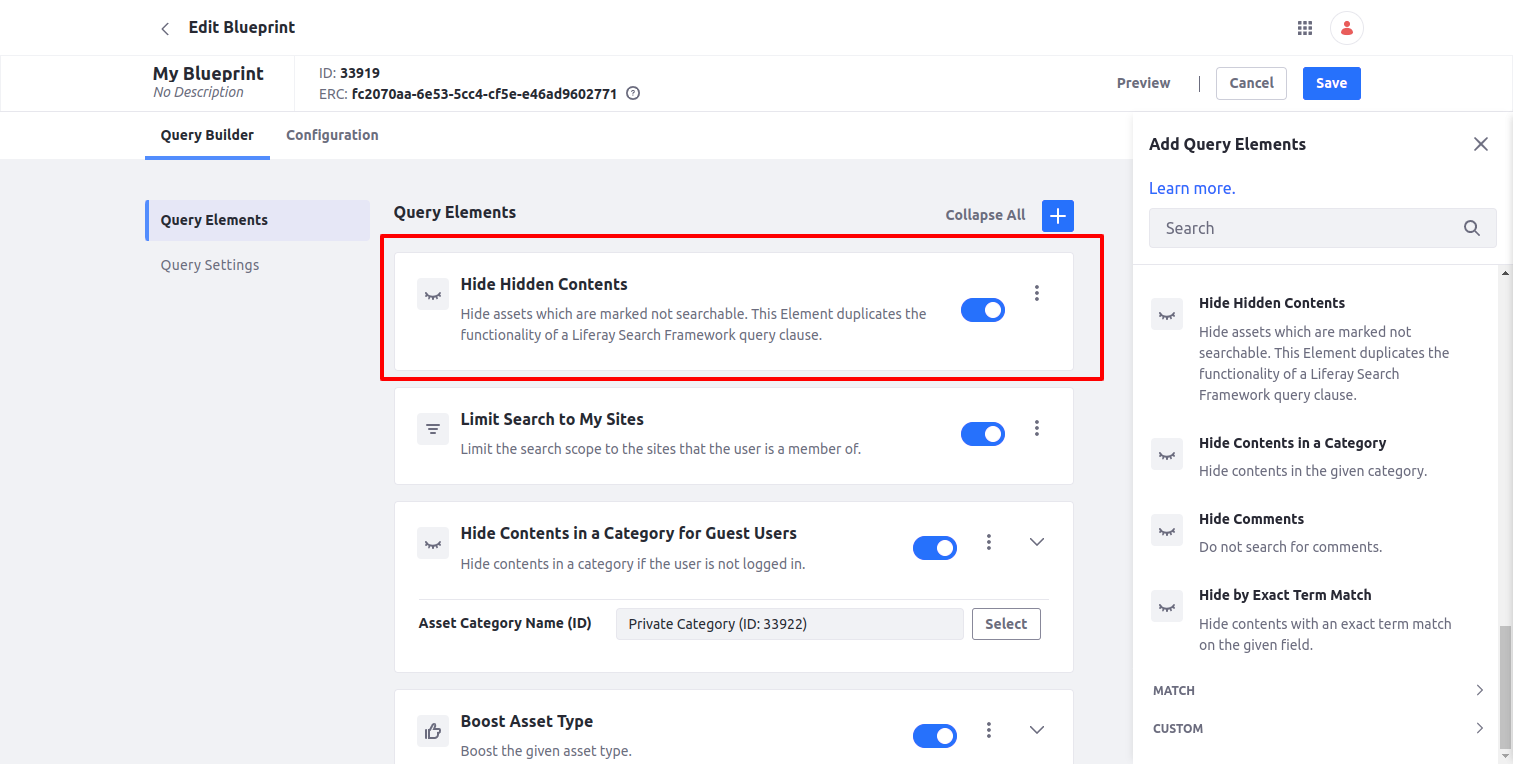
We can hide particular records by adding one of these items.
-
For now, we will hide content which is marked as not searchable
Match:
-
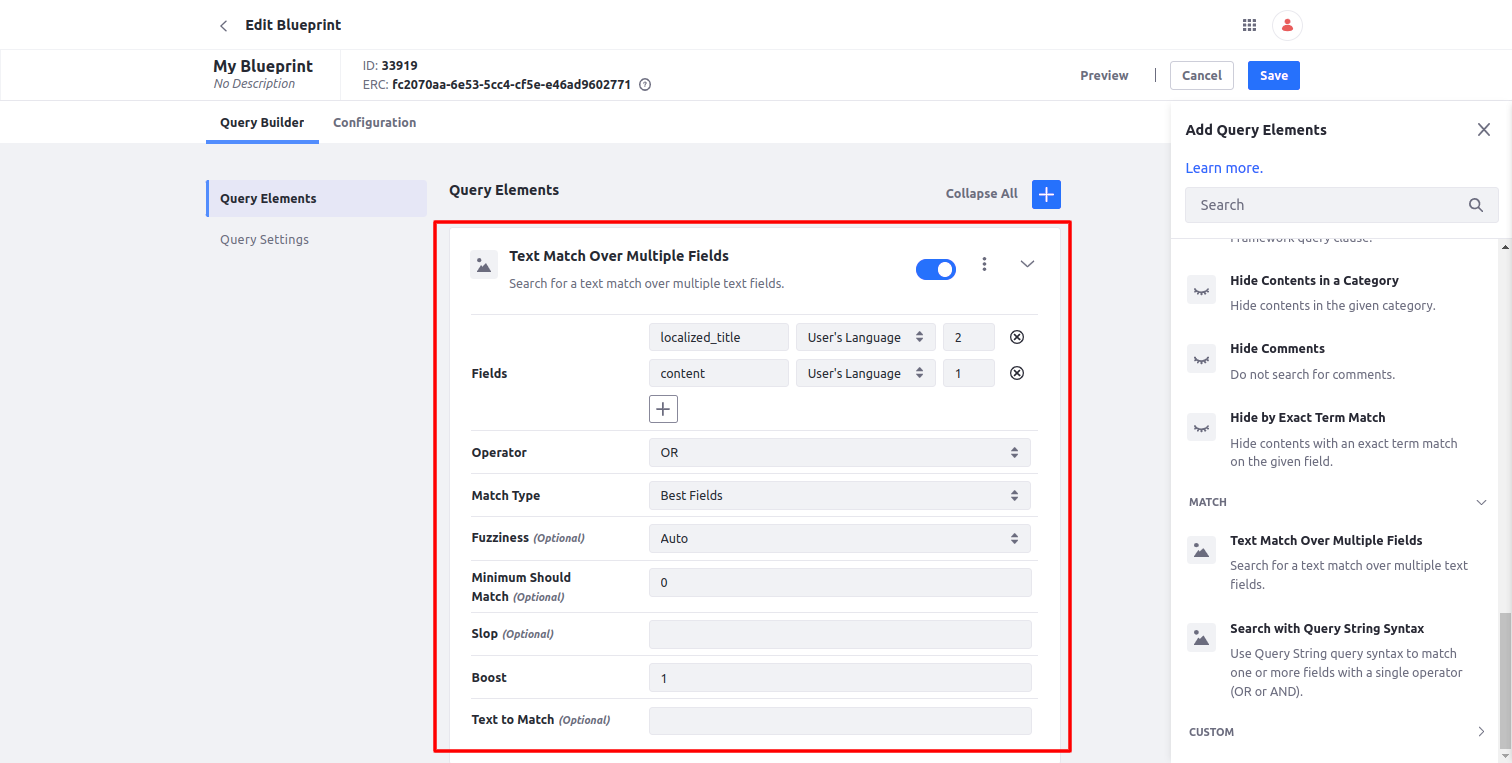
It allows you to add custom match query to the search operation
-
We can select fields that we want to add; we can select operator, boost, fuzziness, slop, etc.
Custom:
-
Allows you to add a custom elastic search query itself.
Also, we can have some query settings for Search Blueprints, Right now, I just kept the default one.
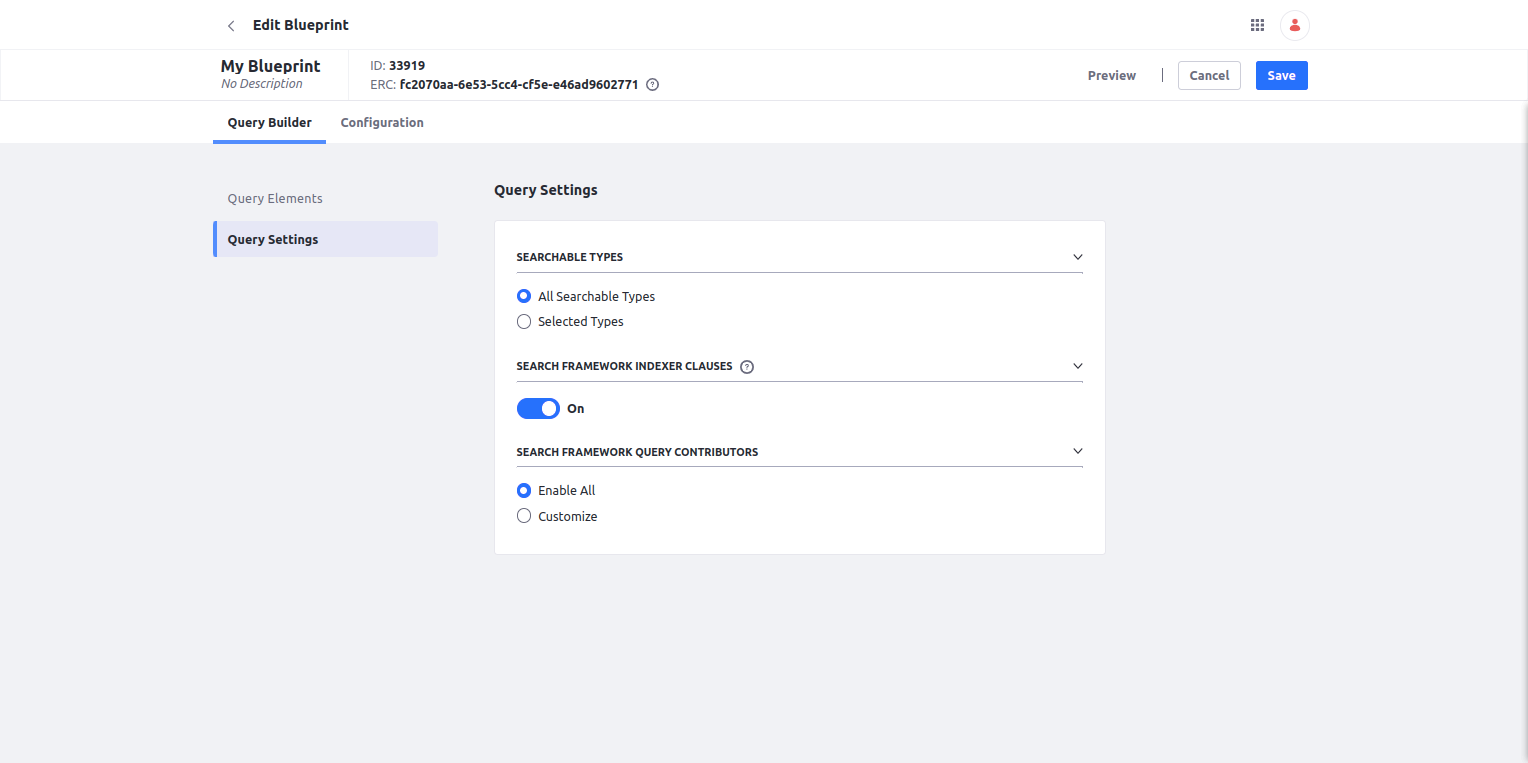
Custom configurations like aggregation, highlight, sort, and parameter can be added from the configurations section.
The 6.1 -> 7.1 upgrade creates a new table, LayoutFriendlyURL and it populates the table from values from the Layout table. In some databases and for some types of backups, if I were to restore the database the Layout table can be reset to what it was, but the LayoutFriendlyURL table might not be removed and/or purged, and this can actually cause problems when the upgrade runs again.
So when I do a restore, I do a clean restore; I drop all of the tables in the database and I delete the D&M folder, then I will restore the DB and the D&M from the backup. This ensures that I won't have any lingering artifacts from a previous failed upgrade.
Plan Preparation
So I needed to create my plan and I knew that I was starting from Liferay EE 6.1 and ending at Liferay DXP 7.4. I started by checking https://learn.liferay.com/dxp/latest/en/installation-and-upgrades/upgrading-liferay/upgrade-basics.html#review-available-upgrade-paths for my available upgrade paths.
From 6.1 I found I have to complete a two-phase upgrade, phase 1 is 6.1 -> 7.1, and phase 2 is 7.1 -> 7.4.
Using this as the foundation, I was ready to create my plan...
My Plan
So here's my plan in all of it's glory.
Step 1. Create a local EE 6.1 environment
Here my goal is to create a new 6.1 database (potentially restored from the prod database) and use a 6.1 bundle with the D&M (also restored). And I don't want to just create the environment, I want to fire it up and make sure it is able to connect to the database and expose all of the D&M files.
With this ready, I at least know I'm starting the upgrade from an environment that works.
Step 2. Prepare upgrade to Liferay DXP 7.1
This preparation is also detailed and requires me to complete the following:
- Download the latest available Liferay DXP 7.1 and expand the bundle. I always want to use the latest version as it will have product fixes including fixes to the upgrade code.
- Ask support for a DXP 7.1 developer license since that's all I need for the upgrade and install it to osgi/modules.
- Download a JDBC driver if necessary (i.e. Liferay doesn't ship with the Oracle JDBC driver so I pull that separately) and add it to Liferay's tomcat/lib/ext directory.
- Copy the 6.1 portal-ext.properties to my 7.1 environment, then edit to ensure that any 6.1-specific paths are updated for the 7.1 environment.
- Discard the data/document_library directory and copy the one from the 6.1 environment.
- Update the db upgrade tool properties. For the portal-upgrade-database.properties file specifically, set all of the JDBC parameters to connect to the database to run. The other two property files can be manually edited or you can wait for the tool to run and it will prompt you for the values.
- Disable the module framework dependency manager thread pool by adding the following properties to the portal-upgrade-ext.properties file:
module.framework.properties.dependency.manager.sync.timeout=500
module.framework.properties.dependency.manager.thread.pool.enabled=false
Ultimately this step involves getting together everything necessary for performing the next step, like a doctor preparing her tools for a coming surgery or a chef taking out the ingredients for the next meal.
Step 3. Run the db_upgrade script
The script itself is in the tools/portal-tools-db-upgrade-client directory and you'll either use the Un*x version or the Windows version depending upon your platform.
When I run the script, I use an extended command line to set JVM parameters to avoid runtime memory issues (and possibly forcing a rollback and restart). The command I use is:
./db_upgrade.sh -j "-Xms8g -Xmx8g -XX:MaxNewSize=1536m -XX:MaxMetaspaceSize=1g \
  -XX:MetaspaceSize=1g -XX:NewSize=1536m -XX:SurvivorRatio=7"
I have a pretty beefy system so I can throw 8g at the upgrade process without too much concern.
Although this step, "Run the db_upgrade script", sounds like a simple task, it is really more of an iterative process. Here's the flow that I follow:
- Run the db_upgrade script using the command above.
- Analyze failures to identify problematic data.
- Add SQL to a cleanup script file to "fix" the problematic data.
- Restore the database and D&M directory.
- Run the cleanup SQL script.
- Go to (1) above.
I will iterate over these steps until I get to a point where the db_upgrade script doesn't fail and doesn't report errors on data that I don't already know about.
Why do I go through all of this? The most important thing for a working, functioning Liferay system is the database. The data in there represents all of your pages, all of your web contents, all of your documents, your blog posts, message boards, configuration, etc. A failure in the DB upgrade, even a small one, can have a pretty significant impact in the runtime and stability of your upgraded environment.
So I take every failure seriously. I'll research the Liferay code behind an exception and try to figure out why it failed, even getting help from Liferay Support if I need to. Anything to get to a clean db_upgrade script run.
That last run is the source that you use for estimating your upgrade times. It's only an estimate because your local environment is probably a different class of machine from your production environment. Even so, if it takes 12 hours on your local you can be pretty sure that it will take a big chunk of time in production and you can probably also use this as your "worst case scenario" upgrade time for this step.
Step 4. Take a Backup
Yep, it's that time. At this point we have finished the 6.1 -> 7.1 portion of our upgrade, and taking a backup here means that if the next portion of the upgrade fails, I can fall back to this point rather than all the way back to the start.
If the next portion doesn't fail, I've lost nothing but a small bit of time for the backup. But if the next portion does fail, I'll save all of the time from previous upgrade run, and you know by now what that time is going to be.
Step 5. Prepare upgrade to Liferay DXP 7.4
This is effectively the same set of tasks that we did in Step 2, but this time we're doing the same for the latest 7.4.
The one difference, we need to pull forward the data/document_library folder from the 7.1 environment to the 7.4 environment. Since it has already been upgraded, it is the D&M that needs to be used to continue the upgrade to 7.4.
The properties files should be copied in also and edited for the 7.4 environment.
For 7.4, the JDBC jar should be copied to the tomcat/webapps/ROOT/WEB-INF/shielded-container-lib instead of tomcat/lib/ext.
Step 6. Run the db_upgrade script
The process here is going to be the same as the one in Step 3, but we're going to using the 7.4 version of the database upgrade client. We use the same command line (although in the different directory).
Most importantly, we're going to follow the same process: run the script, analyze the results, build a cleanup SQL script, and wash/rinse/repeat until we get a successful run of the upgrade process.
And we do this for the same reason as in Step 3, we want to set a solid foundation for the 7.4 environment by starting from an error-free database upgrade.
Step 7. Take a Backup
May seem strange to take a backup after you're done, but I think it is a great time to get a backup.
You'll be capturing a snapshot of the database and D&M folder after the DB upgrade is completed but before you are starting up your 7.4 environment. Having the backup at this point gives you a fallback point if your 7.4 development or deployment goes sideways.
Conclusion
So the important part here, at least for me, is that I have a plan to complete the upgrade. I've documented the plan so I or any member of the team can follow. It's also repeatable because the steps are clearly documented.
The process itself also focuses on getting a clean database upgrade as the foundation of the 7.4 environment. A clean database upgrade increases the probability of an overall successful upgrade.
It's important to remember though that the successful db upgrade client run does not imply that there might not be issues in 7.4. Further testing with your customizations and your content is still necessary to validate your updated environment is ready.
But at least you'll be able to start this testing and validation process knowing you're starting from a solid foundation.
I hope this plan and process will help you when it comes time to upgrade your own environment to Liferay CE or DXP 7.4.
Related Assets...
More Blog Entries...