Blogs

Ivica Cardic
To kick off the recently announced partnership between Liferay and Camunda, we produced connectors for bringing Liferay into your Camunda business processes. By combining Liferay's digital experience platform with Camunda's advanced process automation capabilities, you can create powerful automated processes for Liferay.
We'll use an Onboarding Demo process to demonstrate using the inbound and outbound connectors that integrate Liferay DXP with Camunda 8 processes. Liferay events can trigger Camunda processes (from inbound webhook payloads), and Camunda workflows can interact with Liferay's APIs (using outbound API calls) to create and manage users and accounts.
The Onboarding Demo process demonstrates how to automate user onboarding in Liferay DXP using Camunda 8. Here's the process overview:
1. Starts when a webhook event is received from Liferay
2.
Checks if an account exists for the user
3. Routes the request to
appropriate reviewers based on account status
4. Creates an
account if needed
5. Creates a user account
6. Associates the
user with the account
Onboarding Demo Process
The process begins with a Liferay Webhook Start Event connector that receives events from Liferay DXP. We call this an *inbound* connector because it processes an incoming webhook payload generated by an object action.
To begin configuring it, first, we added a start event to the BPMN process, then we set the template to be a Liferay Webhook Start Event. The connector does these things:
1. Listens for incoming HTTP requests from Liferay
2.
Extracts data from the request payload
3. Initiates a new
process instance with the extracted data
The very next step in the process uses the outbound Liferay Connector to interact with Liferay's REST APIs; then it's used multiple additional times in the process. We call this an *outbound* connector because it sends an API request to Liferay.
To begin configuring it, we added a task in the BMN diagram and set the template to Liferay Connector.
The process makes several outbound API calls to Liferay:
1. Checks account existence to verify if an account already
exists
2. Creates a new account if needed
3. Create a new user
account
4. Associates the user with the account
Step-by-Step Guide: Setting Up the Onboarding Demo
Pre-Requisites
Before setting up the connectors, there is some initial setup in Liferay Camunda to take care of:
Liferay: Create the Object
1. Create the Application Form custom object:
Steps:
1. Go to Control Panel > Objects
2. Create a custom
object folder called "Onboarding Demo"
3. In the
folder, create a custom object called _ApplicationForm_ with the
following fields:
firstName (Text field)
secondName (Text field)
email (Text field)
accountNumber (Text field)

2. Publish the object:

3. To access the form, set the Panel Link to Users:

4. Access the form:


5. To expose a local Liferay instance so that Camunda can access its APIs, set up ngrok. You can download ngrok from ngrok.com and run it with the following command:
ngrok http 8080

Camunda Cloud: Import the Connectors
To connect Liferay to Camunda, install the Liferay connector templates into Camunda Modeler:
1. Import the following connector templates from the liferay-portal
repository:
- liferay-connector.json (for
outbound API calls to Liferay)
-
liferay-webhook-connector-start-event.json (for
inbound webhook events from Liferay)
Steps:
1. For each template you want, click Download Raw File.
2. In Camunda Modeler, open your project and click Create New →
Upload File; then select the file you downloaded.
3. Open the
new connector and publish it.
The Liferay connector templates are currently available by manual upload only.
2. Import the New Account.form file for creating new
accounts in the process.
Steps:
1. In Camunda Modeler, open your project and click Create New → Upload File; then select the New Account Form.form file.


Configuring the Connectors
Inbound Connector: Liferay Inbound Connector: Webhook Start Event
In our Onboarding Demo, the start event is configured with these properties:


This configuration:
- Uses the Liferay webhook connector
- Accepts any HTTP method
- Defines a unique context ID for this
webhook
- Doesn't require authentication
- Extracts specific
fields from the request body using a result expression
Steps to configure the Liferay Inbound Connector
1. Add a Start Event: In your BPMN diagram, add a start event
where the process will begin.
2. Apply the Liferay Webhook Start
Event Connector: Select the start event and apply the "Liferay
Webhook Start Event Connector" template.
3. Configure
Output Mapping: Set the result expression:
{
"accountExternalReferenceCode":
request.body.objectEntryDTOApplicationForm.properties.accountNumber,
"userFirstName":
request.body.objectEntryDTOApplicationForm.properties.firstName,
"userLastName":
request.body.objectEntryDTOApplicationForm.properties.lastName,
"userEmailAddress":
request.body.objectEntryDTOApplicationForm.properties.email
}
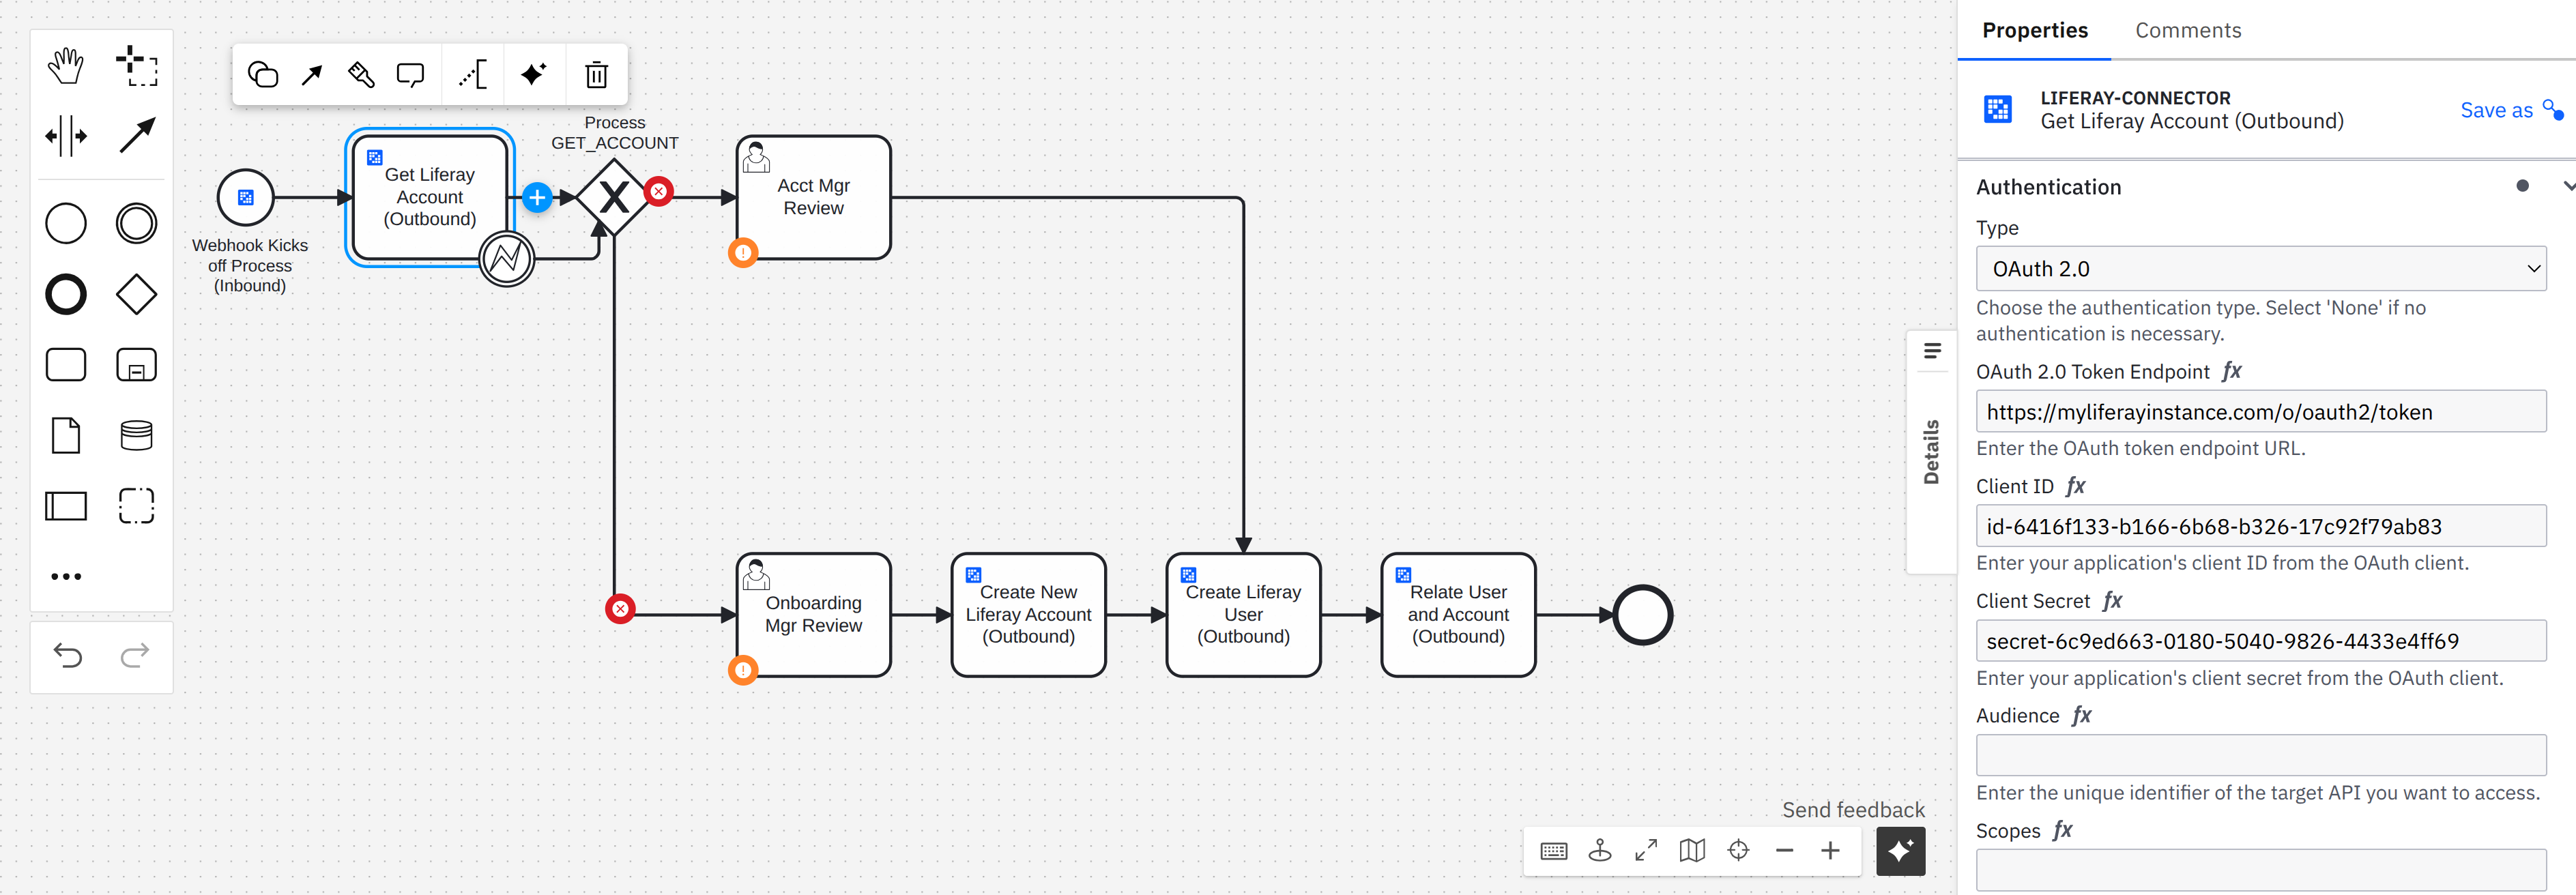
Steps to configure the Liferay Outbound Connector
1. Obtain OAuth Credentials from Liferay:
- Go to Control
Panel > OAuth2 Administration
- Create an OAuth 2.0
application in Liferay
- Note the client ID and client
secret
- Configure the OAuth2 Properties: Set the following properties:
CallbackURIs:
@protocol@://localhost:@port-with-colon@/o/oauth2/redirect
Client Authentication Method: Client Secret Basic
or Post
Client Profile: Headless Server
Allowed Authorization Types: Client Credentials,
JWT_BEARER
Trusted Application: Check this
box to allow the application to access Liferay APIs without user interaction.

- Click Save, then open the Scopes tab. Configure the following scopes:


2. Add Get Account in Liferay using Liferay Account API
Connector:
- Add an Outgoing Connector**: In your BPMN diagram,
add a service task where you want to make the API call.
- Apply
the Liferay Connector: Select the service task and apply the
"Liferay Connector" template.
- Configure the Connector
Properties: Set the following properties:
-
Name: Get Account in Liferay using Liferay Account
API
- Authentication:
-
Type: OAuth 2.0
- OAuth 2.0 token
endpoint**: https://liferay.ngrok.dev/o/oauth2/token
- Client ID**: <Provided by Liferay OAuth
application>
- Client Secret**:
<Provided by Liferay OAuth application>
- HTTP
Endpoint
- Model Type: Other
- Base URL:
https://liferay.ngrok.dev/o/headless-admin-user
-
Path:
"/v1.0/accounts/by-external-reference-code/" +
accountExternalReferenceCode
- Method:
GET
- Output Mapping
-
Result Expression:
{
"accountStatus": response.status
}
- Error Handling
- Error
Expression:
if error.code =
"404"
then bpmnError("404",
"The acount does not exist", {accountStatus: 404})
else null


3. Add Error Boundary Event:
- Configure the Error Boundary
Event Properties: Set the following properties:
-
Outputs:
-
accountStatus:
- Process variable
name: accountStatus
- Variable assignment
value: accountStatus

4. Add Exclusive Gateway:

5. Add Sequence Flow:
- Configure the Error Boundary Event
Properties: Set the following properties:
-
Condition:
- Condition
Expression: accountStatus = 200

6. Add Sequence Flow:
- Configure the Error Boundary Event
Properties: Set the following properties:
-
Condition:
- Condition
Expression: accountStatus != 200

7. Add Account Manager Review Task:
- Add a User Task: In
your BPMN diagram, add a user task where you want to execute the
user task.
- Apply the User Task: Select the user task.
-
Configure the User Task Properties: Set the following
properties:
- Name: Account Manager
Review
- Candidate groups: ["Account Managers"]


8. Add Onboarding Manager Review Task:
- Add a User Task: In
your BPMN diagram, add a user task where you want to execute the user
task.
- Apply the User Task: Select the user task.
- Configure
the User Task Properties: Set the following properties:
-
Name: Onboarding Manager Review
-
Candidate groups: ["Onboarding Managers"]


9. Add Create new Account in Liferay using Liferay Account API
Connector:
- Add an Outgoing Connector: In your BPMN diagram, add
a service task where you want to make the API call.
- Apply the
Liferay Connector: Select the service task and apply the "Liferay
Connector" template.
- Configure the Connector Properties:
Set the following properties:
- Name: Create a
new Account in Liferay using the Liferay Account API
-
Authentication:
- Type:
OAuth 2.0
- OAuth 2.0 token endpoint:
https://liferay.ngrok.dev/o/oauth2/token
- Client
ID: <Provided by Liferay OAuth application>
-
Client Secret: <Provided by Liferay OAuth
application>
- HTTP Endpoint
-
Model Type: Other
- Base
URL: https://liferay.ngrok.dev/o/headless-admin-user
- Path: /v1.0/accounts
-
Method: POST
-
Payload:
- Request
Body:
{
"description": accountDescription,
"externalReferenceCode": accountExternalReferenceCode,
"name": accountName
}
- Output Mapping
-
Result Expression:
{
"accountExternalReferenceCode":
response.body.externalReferenceCode
}


10. Add Create new User in Liferay using Liferay User API
Connector:
- Add an Outgoing Connector: In your BPMN diagram, add
a service task where you want to make the API call.
- Apply the
Liferay Connector: Select the service task and apply the "Liferay
Connector" template.
- Configure the Connector Properties:
Set the following properties:
- Name: Create
new User in Liferay using Liferay User API
-
Authentication:
- Type:
OAuth 2.0
- OAuth 2.0 token endpoint:
https://liferay.ngrok.dev/o/oauth2/token
- Client
ID: <Provided by Liferay OAuth application>
-
Client Secret: <Provided by Liferay OAuth
application>
- HTTP Endpoint
- Model Type: Other
- Base
UR*: https://liferay.ngrok.dev/o/headless-admin-user
- Path: /v1.0/user-accounts
-
Method: POST
-
Payload:
- Request
Body:
{
"alternateName": userFirstName,
"emailAddress": userEmailAddress,
"familyName": userLastName,
"givenName": userFirstName
}
- Output Mapping
-
Result Expression:
{
"userExternalReferenceCode" :
response.body.externalReferenceCode
}


11. Add Associate new User with Account in Liferay using Liferay
User API Connector:
- Add an Outgoing Connector: In your BPMN
diagram, add a service task where you want to make the API call.
-
Apply the Liferay Connector: Select the service task and apply the
"Liferay Connector" template.
- Configure the Connector
Properties: Set the following properties:
-
Name: Associate new User with Account in Liferay
using Liferay User API
- Authentication:
- Type: OAuth 2.0
- OAuth
2.0 token endpoint:
https://liferay.ngrok.dev/o/oauth2/token
- Client
ID: <Provided by Liferay OAuth application>
- Client Secret: <Provided by Liferay OAuth
application>
- HTTP Endpoint
- Model Type: Other
- Base
URL: https://liferay.ngrok.dev/o/headless-admin-user
- Path:
"/v1.0/accounts/by-external-reference-code/" +
accountExternalReferenceCode +
"/user-accounts/by-external-reference-code/" +
userExternalReferenceCode
- Method: POST


Setting Up the Webhook in Liferay
1. Go to Control Panel > Objects > ApplicationForm
2.
Click on "Actions" tab
3. Click on "Add Object
Action"
4. Click on "Action Builder"
5. Under
"Trigger -> When" select "On After Add"
6.
Under "Action -> Then" select "Webhook"
7.
Under URL insert the Webhook URL provided by Camunda (e.g., `https://<your-camunda-instance>/inbound/<webhook-id>`).


Deploy the workflow to the Camunda cluster
1. Inside the Camunda workflow editor, click on the "Deploy & run" button:

2. Click "View Processes instance" to see the deployed process:

3. Inside Camunda Operate, you can monitor the process instances:


4. Click on "Open Tasklist" to see the tasks, review, and approve them:

5. Assign, review, and approve the task:


6. The process will continue to the next task until it finishes, and you can see the process instance in the Operate:

7. On the Liferay side, you can check the created user and the associated account:


Complete Process File
You can download the complete BPMN process file here: Onboarding Demo.bpmn
Conclusion
Liferay's Camunda connectors provide a powerful way to integrate Liferay DXP with Camunda 8 processes. The inbound webhook connector enables Liferay to trigger processes in Camunda, while the outbound Liferay connector allows processes to interact with Liferay's APIs.
By following the patterns demonstrated in the Onboarding Demo process, you can implement sophisticated integration scenarios between Liferay and Camunda, enabling automated workflows that span both platforms.
Related Assets...
More Blog Entries...

