Blogs
As you build out multiple Javascript-based custom elements, you'll find yourself using the same code and libraries over and over. Wouldn't it be great if you could share those? You can, and this blog will help you do it...

JS Import Map Client Extensions

David H Nebinger
Introduction
As evidenced by my recent blogs, I'm still on a React Custom Element Client Extension tear... I think this is the best way to develop custom solutions on Liferay because they are free from the Liferay upgrade cycle, so effectively I'm writing these solutions once and I'm done.
As you start building out multiple custom elements though, you'll quickly find yourself reusing code and libraries across the projects.
For example, in my React apps I'm always including React Router. And since I'm consuming Headless APIs and the generated client (see my last blog), I'm including the client as well as its SuperAgent dependency. And lately I've been using React Hook Form for my forms..
Not knowing any better, you'd include these in each one of your custom elements and it would work fine, but eventually you'll face an issue like having to regenerate the client code because you've added an Object or relationship and you want to have it modeled, and then you'll be left figuring out how to replicate the change to all of the modules that have it embedded. Or you need to update the version of SuperAgent you're using and this will be a similar issue.
But I'm here to tell you, there's a better way...
JS Import Maps
I'm going to introduce JS Import Maps in this section; if you already know what they are, feel free to skip ahead to the next section. If you haven't heard of JS Import Maps before or wanted to understand them a little more, this section should prove interesting...
As a modern JavaScript developer, you’re likely familiar with module bundlers like Webpack, Rollup, or Parcel. These tools have been essential for managing dependencies and packaging code for production. However, with the advent of ES Modules (ESM) in browsers, a new way to handle module loading has emerged: JavaScript Import Maps.
What Are Import Maps?
Import Maps are a browser feature that allow you to control how module specifiers (the strings used in import statements) are resolved to actual JavaScript module files. They enable the use of “bare” import specifiers—like 'react' or 'lodash'—in the browser environment without bundling.
In essence, an Import Map is a simple JSON-like object that tells the browser where to find the modules you want to import.
The Problem Import Maps Solve
Traditionally, when you write:
import React from 'react';
In a browser environment, this would fail because the browser doesn’t know where to fetch the 'react' module from. Bundlers solve this by resolving module paths at build time. However, this approach requires a build step and tooling setup.
With Import Maps, you can eliminate the bundling step for certain use cases, allowing the browser to handle module resolution natively.
Benefits of Using Import Maps
We really want to use Import Maps, especially in the portal environment, because we get the following benefits:
Simplified Development
- No Bundler Required: For small projects or simple applications, you can skip the bundling step entirely.
- Faster Iteration: Changes can be tested immediately in the browser without waiting for a build process.
Fine-Grained Control
- Version Management: Easily specify exact versions of libraries.
- Module Aliasing: Map multiple specifiers to the same module or create shortcuts.
Improved Performance
- HTTP/2 Efficiency: Leverage HTTP/2 multiplexing to load multiple modules concurrently.
- Cache Optimization: Browsers can cache individual modules, potentially reducing load times on subsequent visits.
Liferay-Specific Benefits
- Shared Resources: Multiple custom elements using the same shared resources reduces duplicates and possible conflicts.
- Simplified Maintenance: Updating a single JS Import Map module version ensures all dependent custom elements will use the newer version.
Considerations
There are some things to keep in mind with respect to the use of JS Import Maps:
Performance Implications
- Initial Load: May result in more HTTP requests, but this can be mitigated with HTTP/2 and server-side optimizations.
- Caching: Individual modules can be cached by the browser, improving subsequent load times.
Limitations
- Static Mapping: Import Maps are static and cannot be altered at runtime.
- Complex Dependencies: For applications with complex build requirements (like JSX transpilation), bundlers may still be necessary.
When to Use Import Maps
Import Maps are ideal for:
- Prototyping: Quickly testing ideas without setting up a build process.
- Micro Frontends: Managing dependencies in a micro-frontend architecture.
- Legacy Projects: Incrementally modernizing older codebases.
- Sharing Resources: Using the same dependency in multiple custom elements.
By leveraging Import Maps, you can simplify your development workflow and take advantage of native ES Module support in browsers. While they don’t replace bundlers entirely, they offer a powerful tool for certain scenarios where simplicity and control are paramount.
When Not to Use Import Maps
There are reasons not to throw all of your dependencies into an import map. Remember that the declared imports are going to be used on every portal page. If you're declaring yup as a dependency in only one custom element, it doesn't make sense to push that to an import map.
And the Import Map is going to share and expose a single version... Depending upon how you look at it, this can be a good thing because it forces consistency, but if different custom elements need different versions, having the dependency in an Import Map works against your needs.
Now that we know more about JS Import Maps, let's dig into them with a Liferay-specific bent...
Liferay JS Import Maps
Liferay has a client extension for defining JS Import Maps that will make modules available for your custom elements.
Using a JS Import Map, you can load and share both libraries as well as custom code. Using a JS Import Map CX, we can deal with the issues mentioned in the introduction by updating one CX and deploying it knowing that all others will be using the updated code almost by magic.
So, how do we set up and use a JS Import Map CX? Well let's figure that out together as we bundle the generated Headless client and dependency from my last blog as a JS Import Map, then we'll see how to use it in a React Custom Element Client Extension.
Creating the Shared Module CX
So the first thing we'll do is create the shared module CX. This is actually pretty easy...
In the client-extensions folder in our workspace, we create a folder to hold the CX. Use a good name so you can recognize the project and its purpose. For my headless Vacation client, I'm going to name my folder vacation-client-js-import-map-entry.
js-import-map-entry suffix is a Liferay standard, so I use it too to be consistent.
We also need to have a client-extension.yaml file, and the initial file is just going to be:
vacation-react-router-import-maps-entry:
  bareSpecifier: react-router-dom
  name: Liferay CoE Frontend React Router DOM Import Maps Entry
  type: jsImportMapsEntry
  url: https://esm.sh/react-router-dom@6.17.0?external=react
vacation-react-hook-form-import-maps-entry:
  bareSpecifier: react-hook-form
  name: Vacation React Hook Form Import Maps Entry
  type: jsImportMapsEntry
  url: https://esm.sh/react-hook-form@7.52.2
vacation-superagent-import-maps-entry:
  bareSpecifier: superagent
  name: Vacation SuperAgent Import Maps Entry
  type: jsImportMapsEntry
  url: https://esm.sh/superagent@9.0.2
And for the build we need a simple package.json file:
{
  "name": "@liferay/vacation-js-import-maps-entry",
  "private": true
}
Now this CX only contains the shared modules that our other custom elements could then leverage.
Specifically we're declaring that we have these three modules that will be loaded by the browser and will be available in our custom React elements as simple imports.
This is all we need for a shared module CX. When we build and deploy this CX, the shared modules will be available for our custom elements to use.
Using the Shared Modules
Just because we've built and deployed our shared module JS Import Map doesn't mean our custom elements are going to automagically start using them. No, we have to actually declare that we are depending upon them, but we'll do this the same way we declare any dependency - in the package.json file.
In the example file below, a custom element is declaring a dependency on react-hook-form:
{
  "name": "@liferay/vacation-request",
  "private": true,
  "version": "0.0.0",
  "type": "module",
  "scripts": {
    ...
  },
  "dependencies": {
    "react-hook-form": "^7.52.2",
    "react": "16.12.0",
    "react-dom": "16.12.0"
  },
  "devDependencies": {
    ...
  }
}
If we do nothing else, when we build this custom element it will include its own copy of react-hook-form.
To avoid embedding its own copy and leveraging the shared module, we need to exclude it from packaging.
Using Vite, we'd just add this as another external resource like we do when we're using Liferay's version of React. Here's the vite.config.js file we'd be using:
import { defineConfig } from 'vite'
import react from '@vitejs/plugin-react'

// https://vitejs.dev/config/
export default defineConfig({
  base: '/o/vacation-request',
  plugins: [react({
    jsxRuntime: 'classic',
  })],
  build: {
    outDir: 'build/vite',
    rollupOptions: {
      external: [
        'react',
        'react-dom',
        'react-hook-form',
        /^(?!@clayui\/css)@clayui.*$/,
      ],
    }
  }
})
When Vite is packaging up the custom element, it will not include react-hook-form, and when deployed it will instead use the version which is provided by the JS Import Map CX that we created and deployed.
Creating a Simple Shared Code CX
So now we know how to share an existing module in Liferay using a JS Import Map CX.
But that's not all that we can do. We can share custom code and elements too.
Before we get to sharing that generated client, let's start by sharing something a little simpler...
We'll create a CX from scratch to expose data, a function, and a React component. These examples should cover your basic cases that you'll face, but of course they can be built out to include a library of functions and/or components once we know how to handle the simple cases...
We're going to start in a workspace that you already have, at the command line and inside of the client-extensions folder. If you have used blade init to create a new workspace, you may need to create the client-extensions folder yourself.
So, here's the steps we'll take to create our shiny new shared code CX:
Step 1 - Create the Project
We need to create the project and, rather than copying from the Liferay samples workspace, we're going to create from scratch.
Here's the actual commands/output:
$ mkdir vacation-shared-code-js-import-map-entry
$ cd vacation-shared-code-js-import-map-entry
$ yarn init -y
yarn init v1.22.22
warning The yes flag has been set. This will automatically answer yes to all
  questions, which may have security implications.
success Saved package.json
✨  Done in 0.01s.
$ yarn add vite --dev
yarn add v1.22.22
[1/4] 🔍  Resolving packages...
[2/4] 🚚  Fetching packages...
warning Pattern ["vite@^5.4.6","vite@^5.2.0","vite@^5.2.0"] is trying to unpack
  in the same destination "/Users/dnebinger/Library/Caches/Yarn/v6/
  npm-vite-5.4.6-85a93a1228a7fb5a723ca1743e337a2588ed008f-integrity/node_modules/
  vite" as pattern ["vite@^5.4.6"]. This could result in non-deterministic behavior,
  skipping.
[3/4] 🔗  Linking dependencies...
[4/4] 🔨  Building fresh packages...
success Saved 1 new dependency.
info Direct dependencies
info All dependencies
└─ vite@5.4.6
✨  Done in 1.87s.
$ mkdir src
$ touch src/index.js
This is going to create a new yarn-based module that leverages Vite and we have the initial index.js that we'll be modifying in a bit.
As part of the project setup, let's edit the package.json file so it is ready:
{
  "dependencies": {
    "react": "16.12.0",
    "react-dom": "16.12.0"
  },
  "devDependencies": {
    "@types/react": "^16.14.1",
    "@types/react-dom": "^16.9.7",
    "@vitejs/plugin-react": "^4.2.1",
    "vite": "^5.2.0"
  },
  "exports": {
    ".": {
      "import": "./build/vite/index.js"
    }
  },
  "name": "@liferay/vacation-shared-code",
  "private": true,
  "scripts": {
    "build": "vite build",
    "dev": "vite",
    "preview": "vite preview"
  },
  "type": "module",
  "version": "1.0.0"
}
This adds some stuff to the generated package.json the tools give us. It flushes out the scripts section, but more importantly it declares that exports and it gives the module the name that will be used for future import statements.
In addition, let's also update the vite.config.js file so it too is ready:
import { resolve } from 'path'
import { defineConfig } from 'vite'
import react from '@vitejs/plugin-react'

// https://vitejs.dev/config/
export default defineConfig({
  build: {
    lib: {
      entry: resolve(__dirname, 'src/index.js'),
      formats: ["es"],
    },
    outDir: 'build/vite',
    rollupOptions: {
      external: [
        'react',
        'react-dom',
      ],
      output: {
        entryFileNames: "[name].js",
      },
    }
  },
  plugins: [
    react({
      jsxRuntime: 'classic',
    })
  ]
})
Like the changes to package.json, the changes here are setting up the exports.
Although we haven't introduced React yet (but we will), I include it in the initial files so I don't have to come back and edit in in later on.
Finally we also need a client-extension.yaml file so build and deployment will work:
assemble:
  - from: build/vite
    into: static
vacation-shared-code-js-import-maps-entry:
  bareSpecifier: "@liferay/vacation-shared-code"
  name: Vacation Shared Code JS Import Maps Entry
  type: jsImportMapsEntry
  url: /index.js
These changes are necessary to declare and expose the JS Import Map once built and deployed into Liferay.
Step 2 - Create the Continents Constant
Well, really this is more about defining shared data than simply a constant, but it is a convenient way to demonstrate how it is done.
Let's make a folder to hold the continents and then populate it:
$ mkdir src/data
$ cat > src/data/continents.js
export default {
  AF: 'Africa',
  AN: 'Antarctica',
  AS: 'Asia',
  EU: 'Europe',
  NA: 'North America',
  OC: 'Oceania',
  SA: 'South America',
};
$ cat >> src/index.js
export {default as continents} from './data/continents';
Our continents file contains a simple mapping of keys to continent names. Simple data, certainly, but if you can imagine your own shared data needs exposing them in this similar way, that's the idea.
We also need to update the primary index.js file to export the data and the name to export it by. This will be important to reference the data from the JS Import Map.
Step 3 - Deploy and Test
So let's see this in action!
In the folder, I used the following commands:
$ yarn install
yarn install v1.22.22
[1/4] 🔍  Resolving packages...
[2/4] 🚚  Fetching packages...
[3/4] 🔗  Linking dependencies...
[4/4] 🔨  Building fresh packages...
success Saved lockfile.
✨  Done in 0.50s.
$ blade gw deploy

> Task :yarnInstall
yarn install v1.13.0
[1/4] Resolving packages...
success Already up-to-date.
Done in 0.09s.

> Task :client-extensions:vacation-shared-code-js-import-map-entry:packageRunBuild
yarn run v1.13.0
$ vite build
vite v5.4.6 building for production...
transforming...
✓ 2 modules transformed.
rendering chunks...
computing gzip size...
build/vite/index.js  0.17 kB │ gzip: 0.14 kB
✓ built in 23ms
Done in 0.36s.

Deprecated Gradle features were used in this build, making it incompatible with
Gradle 9.0.

You can use '--warning-mode all' to show the individual deprecation warnings and
determine if they come from your own scripts or plugins.

For more on this, please refer to https://docs.gradle.org/8.5/userguide/
  command_line_interface.html#sec:command_line_warnings in the Gradle documentation.

BUILD SUCCESSFUL in 1s
11 actionable tasks: 2 executed, 9 up-to-date
After deployment is complete and the module is started, you can log into Liferay as an admin, go to the Site menu, to the Design section and choose Fragments, then create a new fragment.
Before putting in any code, take a moment to pull up the inspection panel and go to the console so you can see the result.
Enter the following text into the Javascript panel:
import { continents } from '@liferay/vacation-shared-code';

console.log(continents);
After this is done, you should see the following in the Javascript console:
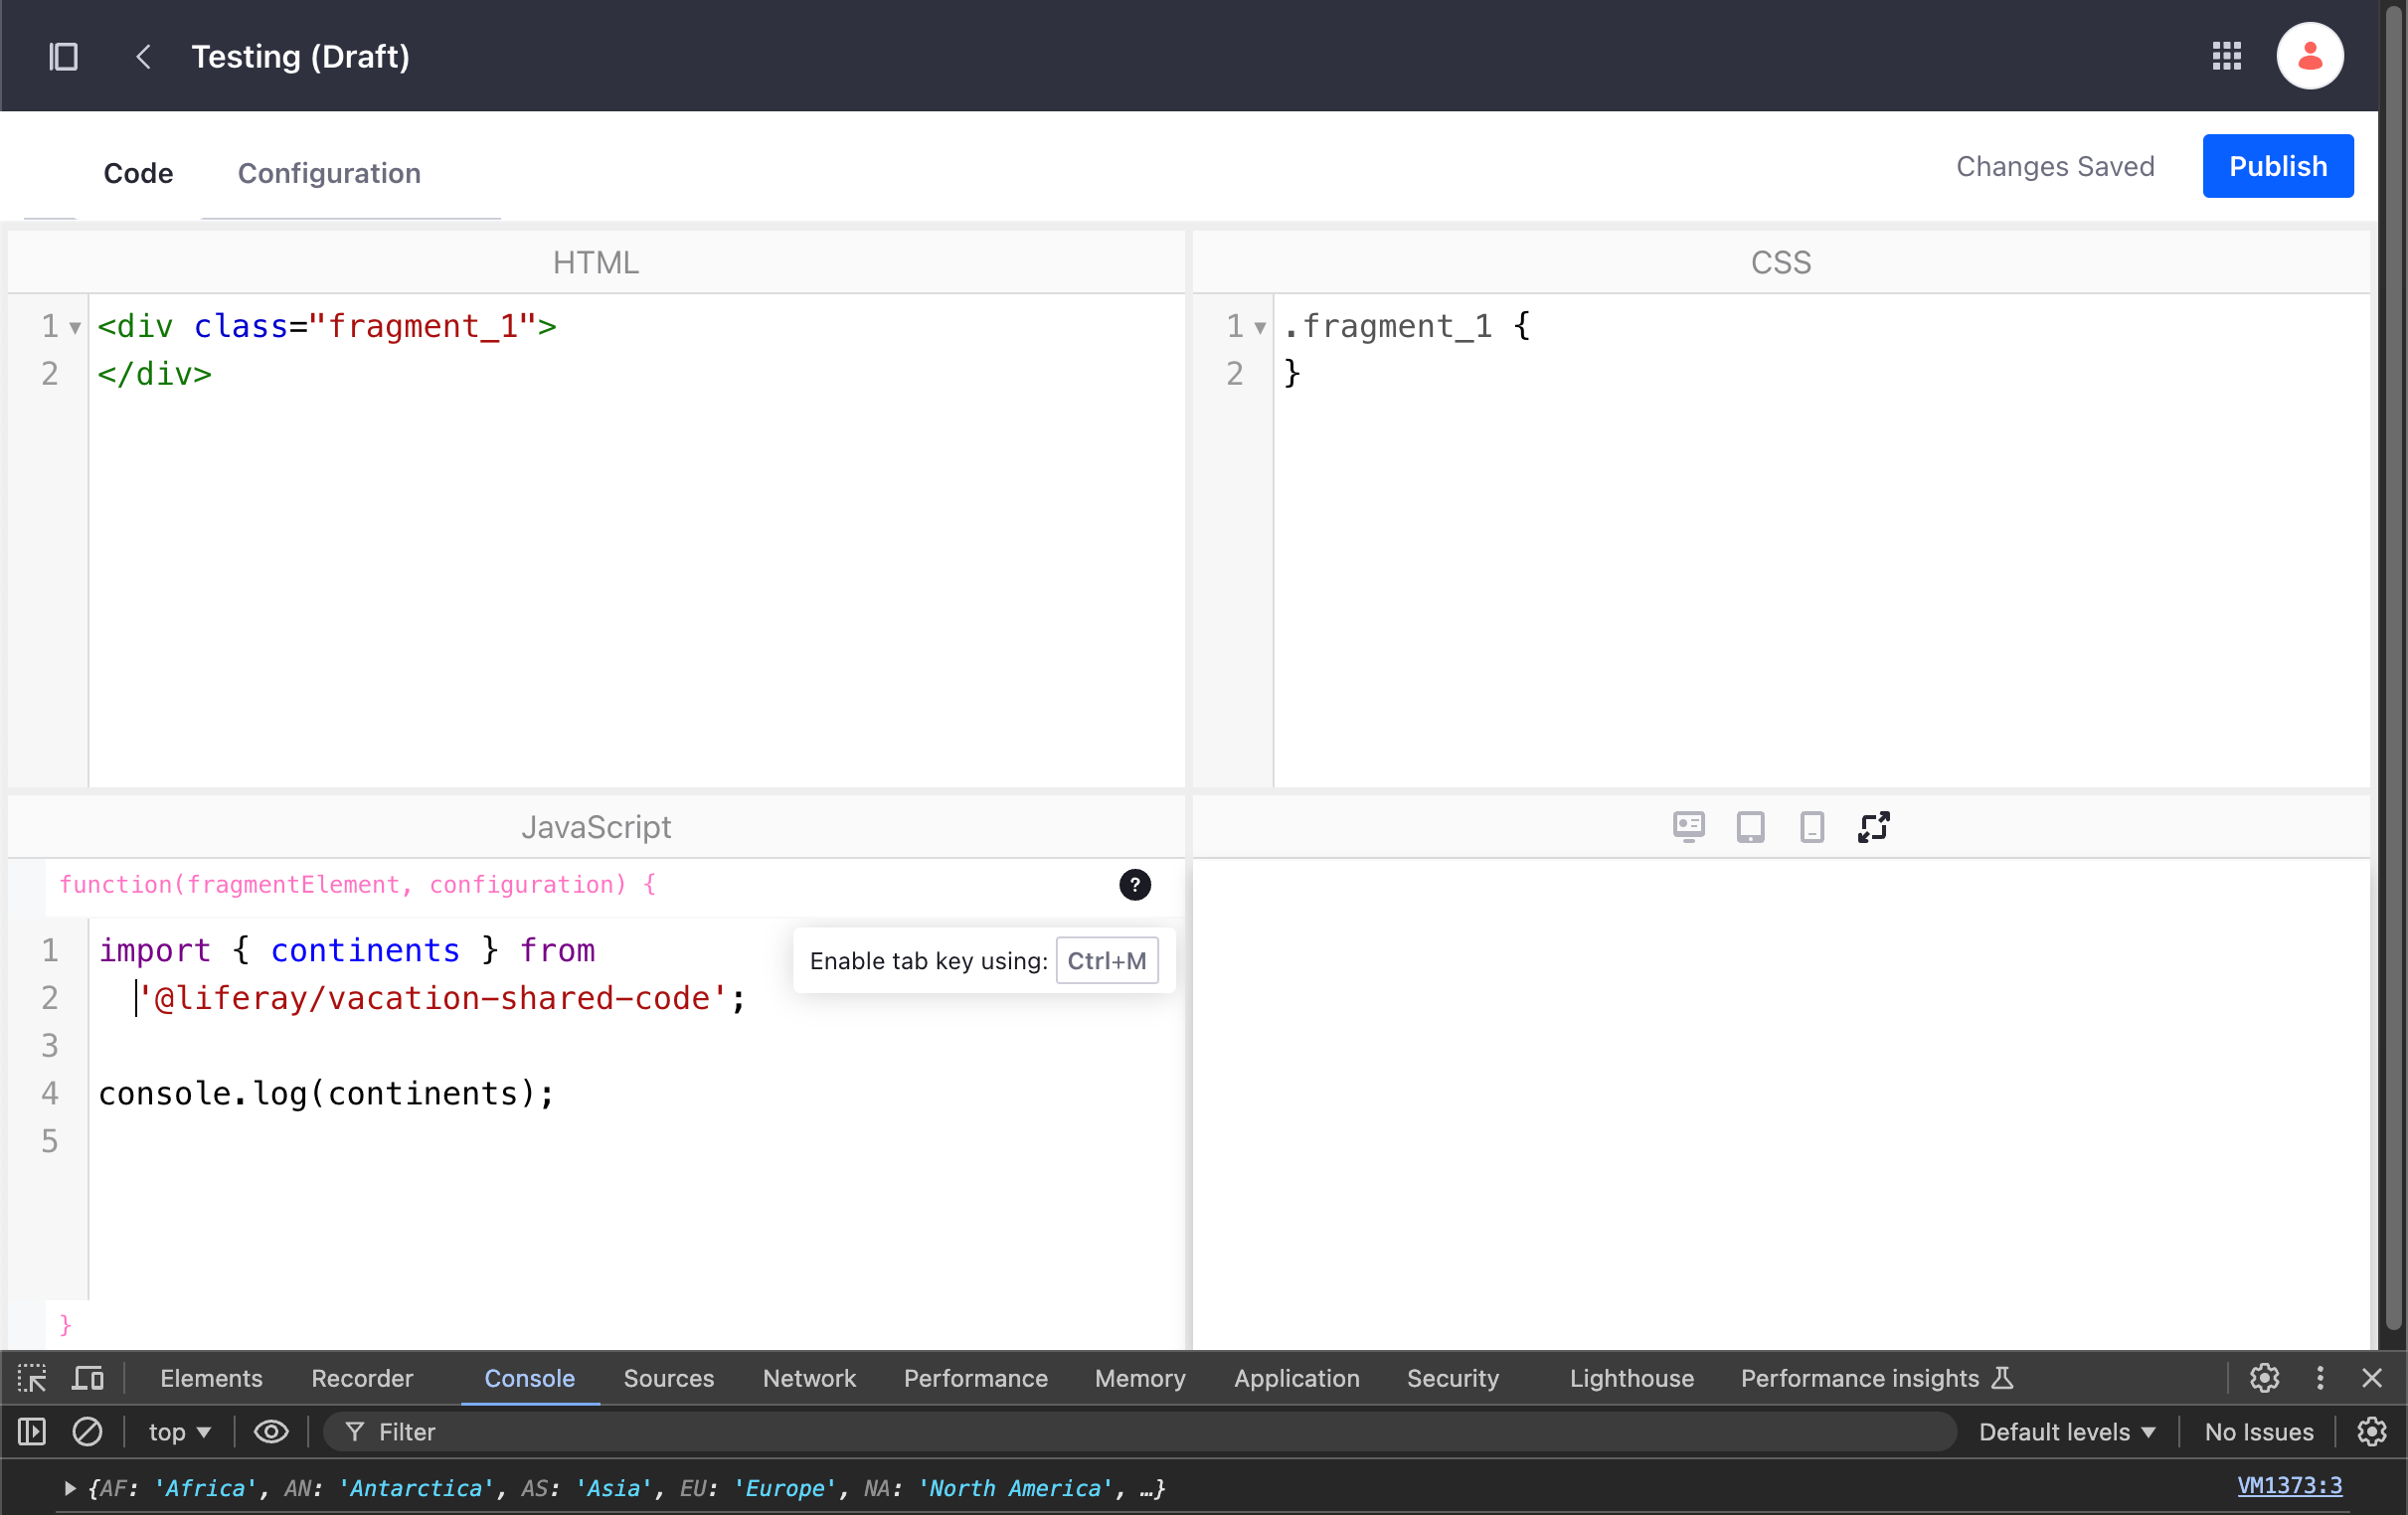
See in the console window there where it has logged the continents? This proves that the module is available for importing the continents data element
client-extension.yaml file's bareSpecifier includes the @liferay prefix, I need to also include that in the import declaration in the Javascript panel. If I exclude the prefix in the bareSpecifier, I would also exclude it in the import declaration.
At the end of the blog we'll find a real React custom element that will take advantage of all of these imports, but for now we know the JS Import Map is working and, at this point, this should be enough to move onto our next example, sharing functions/code.
Step 4 - Create the sayHello() Function
Again, another over simplistic contrived example, but one to demonstrate how you can share functions from the JS Import Maps client extension.
We'll create a util folder to hold the JS file, then we'll create a simple function in there.
$ mkdir src/util
$ cat > src/util/sayHello.js
export default function sayHello(name) {
  return "Hello " + name + ", we're glad you're here!";
}
$ cat >> src/index.js
export { default as sayHello } from './util/sayHello';
The last step adds the export to the index.js so the function will be exposed.
With these changes saved, we can then use blade gw deploy to deploy the updated module.
Once deployed, we can go to our handy fragment and change it to test:
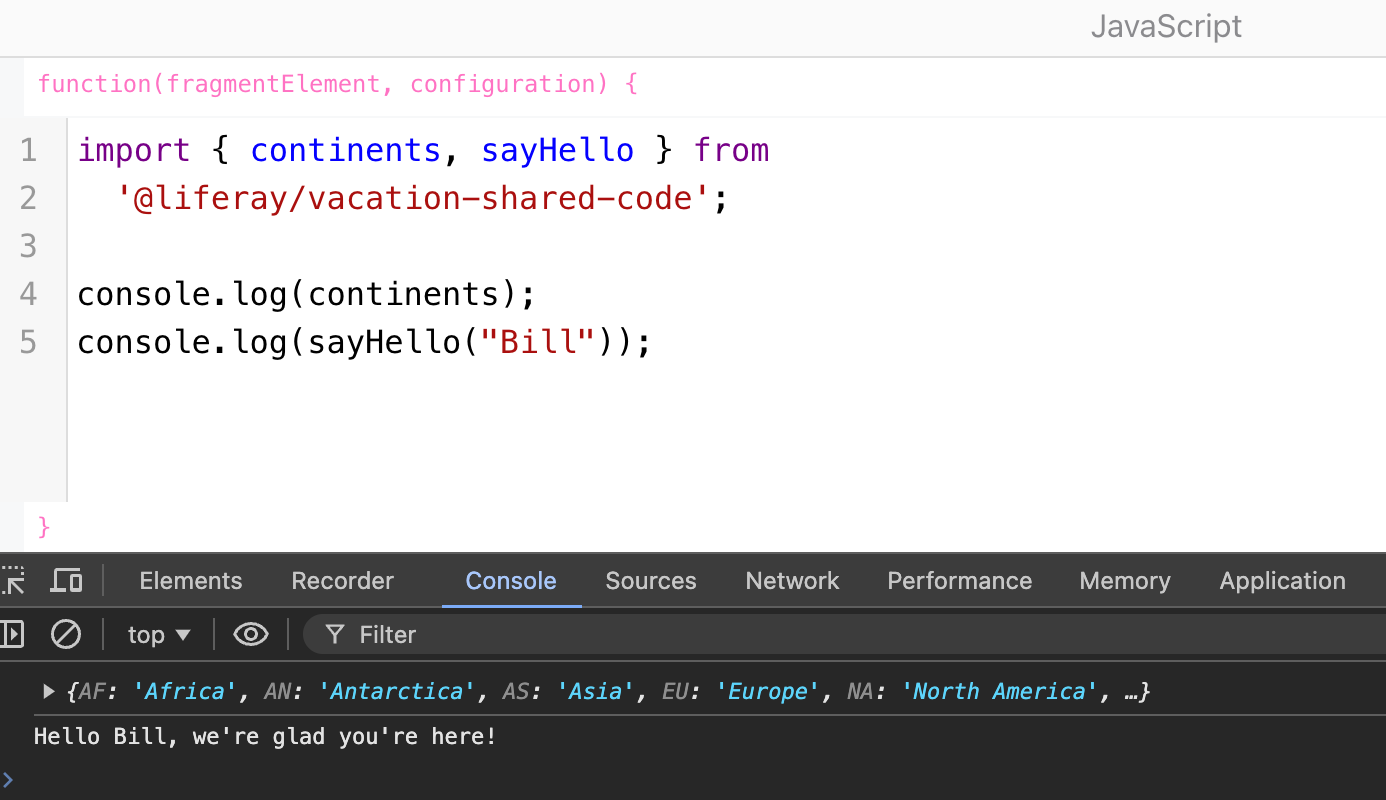
This demonstrates how we could have any number of functions/objects defined within our JS Import Map implementation. As long as they're properly exported by the import map, they can be imported and referenced in your custom fragments and/or custom elements.
Along with custom functions, we can also support custom React elements...
Step 5 - Create the SimpleInput Component
Yes, in this step we're going to create a custom React element that we are going to export and make available a custom React component. The package.json and vite.config.js are already set up to support React, so we don't have to do anything now. If we didn't set that up earlier, we'd have to update the files to include the React support.
We'll start by creating a components folder to hold the new element, then we'll create the SimpleInput component:
$ mkdir src/components
$ cat > src/components/SimpleInput.jsx
import React from 'react';

const SimpleInput = (props) => {
  const {
    id,
    label,
    name,
    value,
    ...restProps
  } = props;

  const inputId = id || name;

  return (
    <div>
      {label && <label htmlFor={inputId}>{label}</label>}

      <input
        {...restProps}
        id={inputId}
        name={name}
        value={value}
      />
    </div>
  );
}

export default SimpleInput;
$ cat >> src/index.js
export {default as SimpleInput} from './components/SimpleInput';
Nothing special here as far as React components go. Just defines a simple component that presents a label with an input and props to handle the settings.
We update the index.js file to export SimpleInput too.
To test this, and others, we'll need to create an actual React Custom Element CX...
Step 6 - Create the Test React Custom Element
Since we have a shared React component, we'll need a React Custom Element CX so we can leverage and use that component.
Now, you might be thinking to create this guy I'm going to point you to my blog, From React App to React Client Extension in 5 Easy Steps, but you'd be wrong. Instead, I'm going to point you at a Bash script I've been using on my Mac called create-react-cx. I'm sure it can be adapted to other platforms, but effectively the script just automates everything we did manually in the 5 steps blog.
Usage is pretty simple:
$ create-react-cx [-s scope] [-e element-name] project-name
Scope is the @liferay portion of the name. If not provided, @liferay is used, but you could use for example -s dnebing to get an @dnebing scope.
Element name is an optional name to use for the element if you want one that is different than the project name (the default). For my test element, I just used create-react-cx vacation-test and it created the project named vacation-test and the element was also vacation-test. Using the -e with a different name just gives you the flexibility to change it from the project name if you want to.
Okay, back to this blog and the use of the custom JS Import Map CX...
First we need a dependency addition in package.json. I made the following change to my package.json file:
{
  "name": "@liferay/vacation-test",
  "private": true,
  "version": "1.0.0",
  "type": "module",
  "scripts": {
    "dev": "vite",
    "build": "vite build",
    "lint": "eslint .",
    "preview": "vite preview"
  },
  "dependencies": {
    "@liferay/vacation-shared-code": "*",
    "react": "16.12.0",
    "react-dom": "16.12.0"
  },
  "devDependencies": {
    "@eslint/js": "^9.9.0",
    "@types/react": "^18.3.3",
    "@types/react-dom": "^18.3.0",
    "@vitejs/plugin-react": "^4.3.1",
    "eslint": "^9.9.0",
    "eslint-plugin-react": "^7.35.0",
    "eslint-plugin-react-hooks": "^5.1.0-rc.0",
    "eslint-plugin-react-refresh": "^0.4.9",
    "globals": "^15.9.0",
    "vite": "^5.4.1"
  }
}
As you can see, there was only one line added. The dependency matches exactly the name I used in the package.json file for the vacation-shared-code-js-import-map-entry project.
Along with this, I also needed to update the vite.config.js file:
import { defineConfig } from 'vite'
import react from '@vitejs/plugin-react'

export default defineConfig({
  base: '/o/vacation-test',
  build: {
    outDir: './vite-build',
    rollupOptions: {
      external: [
        '@liferay/vacation-shared-code',
        'react',
        'react-dom',
        /^(?!@clayui\/css)@clayui.*$/,
      ],
    }
  },
  plugins: [
    react({
      jsxRuntime: 'classic',
    }),
  ]
})
Again I added a single line to the external block indicating that the @liferay/vacation-shared-code dependency would be provided elsewhere and not to package it into the module. Like the package.json change, the exclusion name matches exactly the name from the vacation-shared-code-js-import-map-entry project.
The only thing left is to actually use these new elements. A quick adjustment to the App.jsx file below will do the trick:
import React, { useState, useEffect } from 'react'
import './App.css'
import { sayHello, SimpleInput } from '@liferay/vacation-shared-code'

function App() {
  const [name, setName] = useState('');
  const [greeting, setGreeting] = useState('');

  useEffect(() => {
    setGreeting(sayHello(name));
  }, [name]);


  return (
    <>
      <SimpleInput label="Enter name to be greeted:" name="UserName"
        value={name} onChange={(e) => setName(e.target.value)} />
      <p>{greeting}</p>
    </>
  )
}

export default App;
Note how the import of the artifacts matches exactly the name from the vacation-shared-code-js-import-map-entry project.
Conclusion
So that's really all to show regarding the JS Import Maps.
Admittedly here I only did a very simple case, but the same kind of thing can be applied to any scale that you need.
When you go back to the generated client code that we did in the last blog to access the headless services, you'll see in its own index.js file that it is exporting everything, so it is basically ready to be a module that can be used in Liferay under the same model, you just need to add the necessary files for Liferay to treat it like the JS Import Map entry it wants to be.
Hope you find this as useful as I have!
Related Assets...
More Blog Entries...

